version

Listing Tags in Natural Sort of Version Numbers

Using the Node.js repository as an example:

1
2
3
$ git remote -v
origin https://github.com/nodejs/node.git (fetch)
origin https://github.com/nodejs/node.git (push)

If we would like to list all tags with v0.12 versions, we could do:

1
2
3
4
5
6
7
8
9
10
11
12
13
14
15
16
17
18
$ git tag -l 'v0.12.*'
v0.12.0
v0.12.1
v0.12.10
v0.12.11
v0.12.12
v0.12.13
v0.12.14
v0.12.15
v0.12.2
v0.12.3
v0.12.4
v0.12.5
v0.12.6
v0.12.7
v0.12.8
v0.12.8-rc.1
v0.12.9

However, v0.12.2 should come after v0.12.1.

To fix it, we use the sort command with option:

1
2
-V, --version-sort
natural sort of (version) numbers within text

Thus:

1
2
3
4
5
6
7
8
9
10
11
12
13
14
15
16
17
18
$ git tag -l 'v0.12.*' | sort --version-sort
v0.12.0
v0.12.1
v0.12.2
v0.12.3
v0.12.4
v0.12.5
v0.12.6
v0.12.7
v0.12.8
v0.12.8-rc.1
v0.12.9
v0.12.10
v0.12.11
v0.12.12
v0.12.13
v0.12.14
v0.12.15

Getting the Version of the Latest Release

What’s the latest release of Docker?

Its homepage doesn’t tell you anything. Have to poke around, click on a few links, may or may not get you what you want. If there’s a quick way, even better a CLI method, that will be great.

Couple things we can do. First, when installing docker, we use the URL https://get.docker.com/. It has a path that will return an installation instruction with the version number:

1
2
3
4
5
$ curl https://get.docker.com/builds/
# To install, run the following command as root:
curl -sSL -O https://get.docker.com/builds/Linux/x86_64/docker-1.11.2.tgz && sudo tar zxf docker-1.11.2.tgz -C /
# Then start docker in daemon mode:
sudo /usr/local/bin/docker daemon

There is another way. Well, there is always another way. Docker project is hosted in GitHub, we can use this URL:

1
https://github.com/docker/docker/releases/latest

which will be redirected to the latest release:

1
https://github.com/docker/docker/releases/tag/v1.11.2

Since it’s a redirect, we can use HTTP HEAD method without download the entire response body:

1
2
3
4
5
6
7
8
9
$ curl --silent --head https://github.com/docker/docker/releases/latest
HTTP/1.1 302 Found
Server: GitHub.com
Content-Type: text/html; charset=utf-8
Status: 302 Found
Cache-Control: no-cache
Vary: X-PJAX
Location: https://github.com/docker/docker/releases/tag/v1.11.2
Vary: Accept-Encoding

Extract and process the value of the Location field will get us what we are looking for.

Let’s construct a simple command to obtain such an information:

1
2
3
4
5
6
7
8
9
$ curl \
--silent \
--head \
--url https://github.com/docker/docker/releases/latest | \
grep \
--regexp=^Location | \
cut \
--delimiter=/ \
--fields=8

or:

1
2
3
$ curl -sI https://github.com/docker/docker/releases/latest | \
grep ^Location | \
cut -d / -f 8

Both commands will return v1.11.2.

By using GitHub, not only we can get the latest stable release version of Docker, we can also obtain other projects. In fact, if the project was hosted in GitHub, and it was tagged properly with the releases, you can use this method to obtain the version. However, if it’s not properly tagged, such as Node.js, you need to find another way.

Why Using Exact Versions in NPM Package Dependencies

Versions frequently used in NPM package dependencies are caret ranges or ^version. And npm install uses caret ranges as well.

Caret range:

Allows changes that do not modify the left-most non-zero digit in the [major, minor, patch] tuple. In other words, this allows patch and minor updates for versions 1.0.0 and above, patch updates for version 0.x >=0.1.0, and no updates for version 0.0.x.

Most of time, using caret ranges as dependency versions work perfectly fine. But once a while, there are bugs. In one of projects, JS-YAML with caret version ^3.4.3 was used and installed:

1
2
3
4
5
{
"dependencies": {
"js-yaml": "^3.4.3"
}
}

Time passes. When npm install was run again from a freshly cloned project code base, version 3.5.2 was installed. Since JS-YAML version 3.5.0, errors are thrown when safe loading a spec with duplicate keys. If there are no duplicate keys in the YAML file, this will be fine. However, one of the files has it. The correct approach is to actually fix the duplicate keys. But it requires additional work back and forth. You’ve heard this before: “Hey it works when I installed it.”

The point here is to use exact versions instead of letting the package manager decides by dropping the caret character:

1
2
3
4
5
{
"dependencies": {
"js-yaml": "3.4.3"
}
}

This will avoid the above mentioned problem. We can manually update the outdated NPM packages.

Don’t let machine decide. You Do!

Add a Custom Domain to the Specific Module of Google App Engine Managed VMs

I would like to add a custom domain to a module other than the default one in Google App Engine Managed VMs. For example, I have the following sub-domains:

1
2
3
4
Custom domain names | SSL support | Record type | Data | Alias
------------------- | ----------- | ----------- | -------------------- | -----
api.example.com | none | CNAME | ghs.googlehosted.com | api
admin.example.com | none | CNAME | ghs.googlehosted.com | admin

listed in the application console:

https://console.developers.google.com/project/[project]/appengine/settings/domains

The domain api.example.com points to the default module. And I would like the other domain admin.example.com to point to the module admin. However, by merely adding the custom domain in the settings, both api.example.com and admin.example.com are pointed to the same module: the default module. Then how to point the custom domain and route the traffic to the admin module? The answer is on the dispatch file. But first need to understand the concept of modules in Google App Engine.

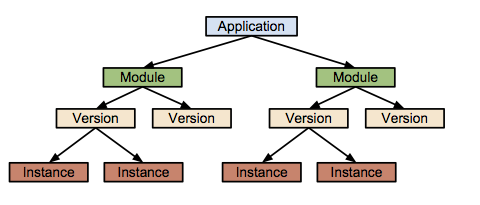
Google App Engine Module Hierarchy
Source: Google App Engine Docs

The above chart illustrates the architecture of a Google App Engine application:

  • Application: “An App Engine application is made up of one or more modules”. [1]
  • Module: “Each module consists of source code and configuration files. The files used by a module represents a version of the module. When you deploy a module, you always deploy a specific version of the module.” [1] “All module-less apps have been converted to contain a single default module.” [1] Every application has a single default module.
  • Version: “A particular module/version will have one or more instances.”
  • Instance: “Each instance runs its own separate executable.”

Another concept is the resource sharing:

  • “App Engine Modules let developers factor large applications into logical components that can share stateful services and communicate in a secure fashion.” [1]
  • “Stateful services (such as Memcache, Datastore, and Task Queues) are shared by all modules in an application.” [1]

Remember that Google Cloud Platform is project based. If there are a web application and a mobile application, and they are both making requests to another application, the API. Then there should be three projects. However, in this case, both api and admin share the same services, such as the same database and file storage. We should put them together in the same application as separate modules.

With that in mind, how to route requests to a specific module? “Every module, version, and instance has its own unique URI (for example, v1.my-module.my-app.appspot.com). Incoming user requests are routed to an instance of a particular module/version according to URL addressing conventions and an optional customized dispatch file.” [1] Since a custom domain is used, we have to use the customized dispatch file. And this is done by creating a dispatch file dispatch.yml to route requests based on URL patterns.

1
2
3
4
5
6
7
8
# Dispatch
# ========
---
dispatch:
- url: '*/favicon.ico'
module: default
- url: 'admin.example.com/*'
module: admin

The application field is not necessary, otherwise, you will get:

1
2
WARNING: The [application] field is specified in file [/home/chao/example/dispatch.yml].
This field is not used by gcloud and should be removed.

Glob characters (such as asterisk) can be used, and support up to 10 routing rules.

Deploy the dispatch file is simple:

1
$ gcloud preview app deploy dispatch.yml

And it should require almost no time to wait. Once it is ready, the requests sent to admin.example.com will be routed properly to the admin module.

The First Release Version

When you have a release for the first time, how do you name your release version based on SemVer? 1.0.0, 0.1.0 or 0.0.1?

I like to start off with 0.1.0. Because version 0.0.0 means there is nothing. Then from nothing to something, that’s breaking change, hence version 0.1.0.

Node Version Manager

Node Version Manager is a simple bash script to manage multiple active Node versions. Why do you want to use it? If you like me, you want to try out the latest unstable version of the Node, but you still need to use the older and stable versions to develop and maintain your projects, then you should use NVM.

You can find out more information on NVM GitHub page, below are just my take on installing and using it.

Install

You can install NVM via the install script, but always do it the hard way by installing it manually:

$ git clone https://github.com/creationix/nvm.git ~/.nvm

Check out the latest version:

$ cd ~/.nvm && git checkout v0.7.0

Enable NVM:

$ source ~/.nvm/nvm.sh

Add this to ~/.bashrc to make it available upon login:

$ echo "\n# Enable NVM"           >> ~/.bashrc
$ echo 'source $HOME/.nvm/nvm.sh' >> ~/.bashrc

Enable Bash completion:

$ echo 'source $HOME/.nvm/bash_completion' >> ~/.bashrc

Try it by opening a new terminal:

$ nvm

Usage

Get help:

$ nvm help

Show current NVM version:

$ nvm --version

Display the currently active Node version:

$ nvm current

Install Node v0.10.28:

$ nvm install 0.10.28

The installed Node version will reside in ~/.nvm/v0.10.28.

List installed versions:

$ nvm ls
    .nvm
v0.10.28

Use a specific Node version:

$ which node
/usr/local/bin/node
$ node -v
v0.11.13
$ nvm use 0.10.28
Now using node v0.10.28
$ node -v
v0.10.28
$ which node
/home/chao/.nvm/v0.10.28/bin/node

Basically, NVM modified the search path.

$ echo $PATH
/home/chao/.nvm/v0.10.28/bin

To roll back:

$ nvm deactivate
/home/chao/.nvm/*/bin removed from $PATH
/home/chao/.nvm/*/share/man removed from $MANPATH
/home/chao/.nvm/*/lib/node_modules removed from $NODE_PATH

List Node versions available to install:

$ nvm ls-remote

Use .nvmrc file:

$ echo '0.10.28' >> .nvmrc
$ nvm use
Found '/home/chao/.nvmrc' with version <0.10.28>
Now using node v0.10.28
$ node -v
v0.10.28