Setting Up Local DNS Server for Multi-Devices

As always, the first thing you have to ask yourself is that why do you want to set up a DNS server? Here are a few of mine:

  • Access web services via custom domains instead of IP addresses
  • Update multiple devices (including mobile devices) is time consuming and inconvenient
  • Router does not provide a DNS server

I run many web services in the local network, for example, GitLab for code repository and Ghost for blogging. Instead of typing IP address for each service, it will be much easier to use custom domain names, for example, accessing my blog via http://ghost/, not dot com nor localhost.

This can be easily done if there is just one machine. You can update the host configuration file in the local machine such as /etc/hosts in Linux or C:\Windows\System32\drivers\etc\hosts in Windows. But I have multiple devices: a laptop, a tablet, and of course a smartphone. Updating multiple devices is a pain. And for many mobile devices running systems such as iOS or Android, it is not easy to edit the host configuration file without rooting the devices. Therefore, we will opt to update a single DNS configuration file.

DNS configuration can be inherited from the DHCP server from the local network router. Unfortunately, the router I have does not provide a built-in DNS server. I have to setup my own DNS server. Once the DNS server has been setup, the router will use the server as the primary DNS server, and falls back to default gateway IP as the secondary DNS server, or we can use either Google’s public DNS server with IP address 8.8.8.8 or any other alternatives.

  • Primary DNS server: 192.168.0.100
  • Secondary DNS server: 192.168.0.1, 8.8.8.8 or others

I am going to setup a DNS server in a Debian Jessie machine. Here is a summary of steps:

  1. Install BIND
  2. Add custom zone

Install BIND

BIND (Berkley Internet Naming Daemon) is the most common program used for maintaining a name server on Linux. In Debian, we use the bind9 package:

1
2
3
4
5
6
7
8
9
10
11
12
13
14
15
16
17
18
19
20
21
22
23
24
25
$ apt-cache show bind9
Package: bind9
Version: 1:9.9.5.dfsg-9+deb8u3
Installed-Size: 966
Maintainer: LaMont Jones
Architecture: amd64
Replaces: apparmor-profiles (<< 2.1+1075-0ubuntu4), bind, bind9utils (<< 1:9.9.3.dfsg.P2-3), dnsutils (<< 1:9.1.0-3)
Depends: libbind9-90 (= 1:9.9.5.dfsg-9+deb8u3), libc6 (>= 2.14), libcap2 (>= 1:2.10), libcomerr2 (>= 1.01), libdns100 (= 1:9.9.5.dfsg-9+deb8u3), libgssapi-krb5-2 (>= 1.6.dfsg.2), libisc95 (= 1:9.9.5.dfsg-9+deb8u3), libisccc90 (= 1:9.9.5.dfsg-9+deb8u3),
libisccfg90 (= 1:9.9.5.dfsg-9+deb8u3), libk5crypto3 (>= 1.6.dfsg.2), libkrb5-3 (>= 1.6.dfsg.2), liblwres90 (= 1:9.9.5.dfsg-9+deb8u3), libssl1.0.0 (>= 1.0.0), libxml2 (>= 2.7.4), debconf (>= 0.5) | debconf-2.0, init-system-helpers (>= 1.18~), netbase, adduser, lsb-base (>= 3.2-14), bind9utils (= 1:9.9.5.dfsg-9+deb8u3), net-tools
Suggests: dnsutils, bind9-doc, resolvconf, ufw
Conflicts: apparmor-profiles (<< 2.1+1075-0ubuntu4), bind
Description-en: Internet Domain Name Server
The Berkeley Internet Name Domain (BIND) implements an Internet domain
name server. BIND is the most widely-used name server software on the
Internet, and is supported by the Internet Software Consortium, www.isc.org.
.
This package provides the server and related configuration files.
Description-md5: afd61d02df1ec6f856b928dfbf6fd201
Section: net
Priority: optional
Filename: pool/updates/main/b/bind9/bind9_9.9.5.dfsg-9+deb8u3_amd64.deb
Size: 314178
MD5sum: 1f030c2848a5dad50a8f7274ca97b218
SHA1: c143b9dd7153e5d00adee2c1f7fc1b8f8ec3f88c
SHA256: 7acc95d7993b085a7e907b974e8e995a060fde091cf7c0224050618b822563dc

Install BIND:

1
2
3
4
5
6
7
8
9
10
11
12
13
14
15
16
17
18
19
20
21
22
23
24
25
26
27
28
29
30
31
32
33
34
35
36
37
$ sudo apt-get install bind9
Reading package lists... Done
Building dependency tree
Reading state information... Done
The following extra packages will be installed:
bind9utils
Suggested packages:
bind9-doc resolvconf ufw
The following NEW packages will be installed:
bind9 bind9utils
0 upgraded, 2 newly installed, 0 to remove and 13 not upgraded.
Need to get 482 kB of archives.
After this operation, 1,654 kB of additional disk space will be used.
Do you want to continue? [Y/n]
Get:1 http://security.debian.org/ jessie/updates/main bind9utils amd64 1:9.9.5.dfsg-9+deb8u3 [168 kB]
Get:2 http://security.debian.org/ jessie/updates/main bind9 amd64 1:9.9.5.dfsg-9+deb8u3 [314 kB]
Fetched 482 kB in 2s (172 kB/s)
Preconfiguring packages ...
Selecting previously unselected package bind9utils.
(Reading database ... 36958 files and directories currently installed.)
Preparing to unpack .../bind9utils_1%3a9.9.5.dfsg-9+deb8u3_amd64.deb ...
Unpacking bind9utils (1:9.9.5.dfsg-9+deb8u3) ...
Selecting previously unselected package bind9.
Preparing to unpack .../bind9_1%3a9.9.5.dfsg-9+deb8u3_amd64.deb ...
Unpacking bind9 (1:9.9.5.dfsg-9+deb8u3) ...
Processing triggers for man-db (2.7.0.2-5) ...
Processing triggers for systemd (215-17+deb8u2) ...
Setting up bind9utils (1:9.9.5.dfsg-9+deb8u3) ...
Setting up bind9 (1:9.9.5.dfsg-9+deb8u3) ...
Adding group `bind' (GID 113) ...
Done.
Adding system user `bind' (UID 108) ...
Adding new user `bind' (UID 108) with group `bind' ...
Not creating home directory `/var/cache/bind'.
wrote key file "/etc/bind/rndc.key"
#
Processing triggers for systemd (215-17+deb8u2) ...

Make sure it is installed:

1
2
3
4
5
6
7
$ dpkg --list bind9
Desired=Unknown/Install/Remove/Purge/Hold
| Status=Not/Inst/Conf-files/Unpacked/halF-conf/Half-inst/trig-aWait/Trig-pend
|/ Err?=(none)/Reinst-required (Status,Err: uppercase=bad)
||/ Name Version Architecture Description
+++-=========================-=================-=================-========================================================
ii bind9 1:9.9.5.dfsg-9+de amd64 Internet Domain Name Server

The logs are written to /var/log/syslog by default. And we can make sure the service is running by checking the DNS port 53:

1
2
3
4
5
6
7
$ netstat -tupln | grep :53
tcp 0 0 192.168.0.100:53 0.0.0.0:* LISTEN 8386/named
tcp 0 0 127.0.0.1:53 0.0.0.0:* LISTEN 8386/named
tcp6 0 0 :::53 :::* LISTEN 8386/named
udp 0 0 192.168.0.100:53 0.0.0.0:* 8386/named
udp 0 0 127.0.0.1:53 0.0.0.0:* 8386/named
udp6 0 0 :::53 :::* 8386/named

Once BIND is installed and running, time to configure it and add our custom domains or zones.

Add Custom Zones

Most of configuration files are located in /etc/bind directory. The files we are going to add or update are:

1
2
3
4
5
/etc/bind
├── db.192 (reverse data file, map IP to domain)
├── db.ghost (forward data file, map domain to IP)
├── named.conf.local (local configuration file)
└── zones.ghost (zone file)

The main configuration file is /etc/bind/named.conf:

1
2
3
4
5
6
7
8
9
10
11
12
$ cat /etc/bind/named.conf
// This is the primary configuration file for the BIND DNS server named.
//
// Please read /usr/share/doc/bind9/README.Debian.gz for information on the
// structure of BIND configuration files in Debian, *BEFORE* you customize
// this configuration file.
//
// If you are just adding zones, please do that in /etc/bind/named.conf.local
include "/etc/bind/named.conf.options";
include "/etc/bind/named.conf.local";
include "/etc/bind/named.conf.default-zones";

But we will not add the zone file directly to the file, instead, use the one for local zones: /etc/bind/named.conf.local:

1
2
3
4
5
6
7
8
9
$ cat named.conf.local
//
// Do any local configuration here
//
// Consider adding the 1918 zones here, if they are not used in your
// organization
//include "/etc/bind/zones.rfc1918";
include "/etc/bind/zones.ghost";

We can use an alternative directory instead of /etc/bind. It might become useful someday.

Create a zone file /etc/bind/zones.ghost:

1
2
3
4
5
6
7
8
9
10
$ cat /etc/bind/zones.ghost
zone "ghost" {
type master;
file "/etc/bind/db.ghost";
};
zone "0.168.192.in-addr.arpa" {
type master;
file "/etc/bind/db.192";
};

Both forward (db.ghost) and reverse (db.192) data files are needed to be added as well:

1
2
3
4
5
6
7
8
9
10
11
12
13
14
$ cat /etc/bind/db.ghost
;
; BIND data file for Ghost
;
$TTL 604800
@ IN SOA ghost. root.ghost. (
2 ; Serial
604800 ; Refresh
86400 ; Retry
2419200 ; Expire
604800 ) ; Negative Cache TTL
;
@ IN NS ghost.
@ IN A 192.168.0.100

and:

1
2
3
4
5
6
7
8
9
10
11
12
13
14
$ cat /etc/bind/db.192
;
; BIND data file for 192.168.0.x
;
$TTL 604800
@ IN SOA ghost. root.ghost. (
1 ; Serial
604800 ; Refresh
86400 ; Retry
2419200 ; Expire
604800 ) ; Negative Cache TTL
;
@ IN NS ghost.
100 IN PTR ghost.

Restart BIND:

1
$ sudo service bind9 restart

Update /etc/resolv.conf:

1
2
$ cat /etc/resolv.conf
nameserver 192.168.0.100

Test:

1
2
3
4
5
6
7
8
9
10
11
12
13
14
15
16
17
18
19
20
21
22
23
$ dig ghost
; <<>> DiG 9.9.5-9+deb8u3-Debian <<>> venus
;; global options: +cmd
;; Got answer:
;; ->>HEADER<<- opcode: QUERY, status: NOERROR, id: 27183
;; flags: qr aa rd ra; QUERY: 1, ANSWER: 1, AUTHORITY: 1, ADDITIONAL: 1
;; OPT PSEUDOSECTION:
; EDNS: version: 0, flags:; udp: 4096
;; QUESTION SECTION:
;ghost. IN A
;; ANSWER SECTION:
ghost. 60 IN A 192.168.0.100
;; AUTHORITY SECTION:
ghost. 60 IN NS ghost.
;; Query time: 3 msec
;; SERVER: 192.168.0.100#53(192.168.0.100)
;; WHEN: Thu Nov 26 12:00:00 GMT 2015
;; MSG SIZE rcvd: 64

Reverse check will return the custom domain ghost:

1
$ dig -x 192.168.0.100

Now it’s time to update the router.

Configure Router

Router usually provides a DHCP server. We just need to provide a custom DNS servers instead of obtaining from upstream:

  • Primary: 192.168.0.100
  • Secondary: 114.114.114.114

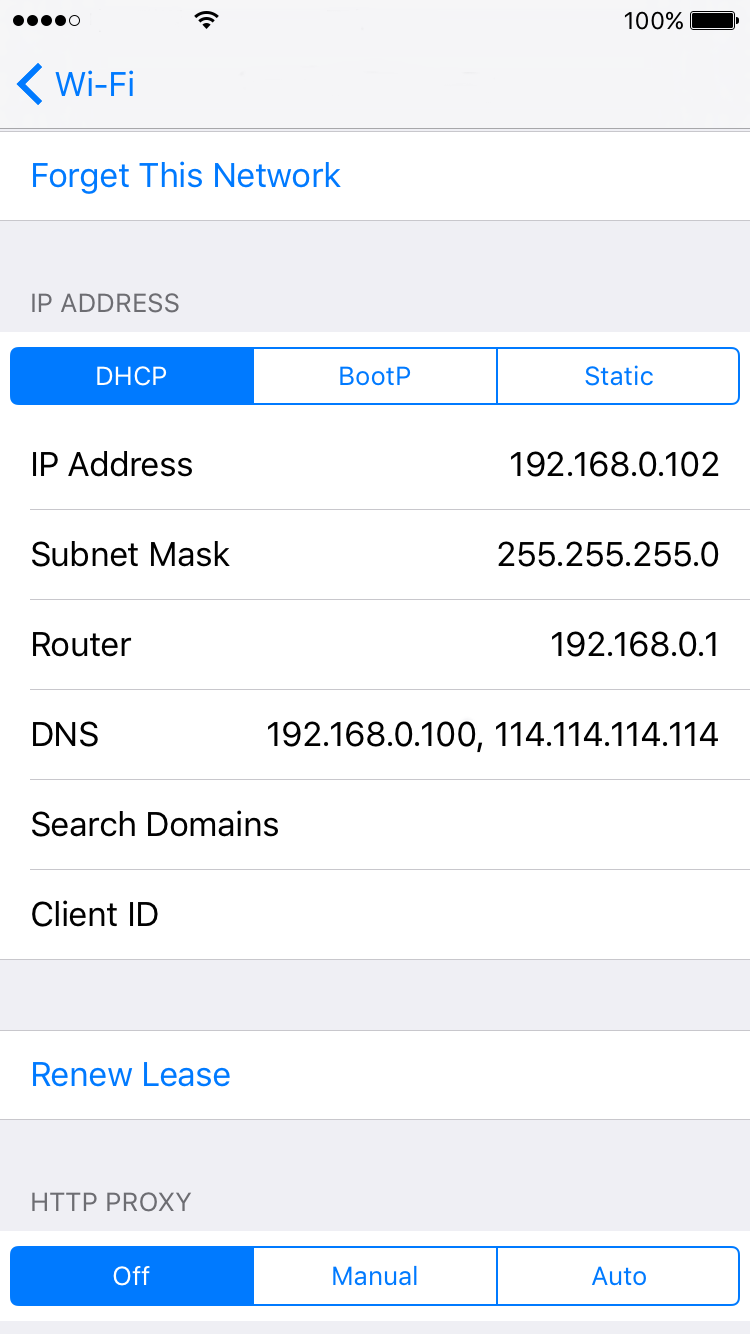
The primary DNS server is the one we just setup, and the secondary is a 114DNS, a DNS server from China. Give some time or just clear the cache in each of devices, it will start using the DNS server we just setup, for example, from the iOS:

iOS Wi-Fi DNS

Now just type in the following URL in your browser from any of your devices:

http://ghost/

Off you go!