vagrant

Overriding the Default Forwarded SSH Port in Vagrant

TLDR:

1
2
# Must specified `id: "ssh"` in order to override the default forwarded SSH port.
config.vm.network :forwarded_port, guest: 22, host: 2322, id: "ssh"

What’s the problem? If running multiple virtual machines managed by Vagrant, SSH port collision will happen:

1
2
3
4
5
6
7
8
9
10
11
12
13
Vagrant cannot forward the specified ports on this VM, since they
would collide with some other application that is already listening
on these ports. The forwarded port to 2222 is already in use
on the host machine.
To fix this, modify your current projects Vagrantfile to use another
port. Example, where '1234' would be replaced by a unique host port:
config.vm.network :forwarded_port, guest: 22, host: 1234
Sometimes, Vagrant will attempt to auto-correct this for you. In this
case, Vagrant was unable to. This is usually because the guest machine
is in a state which doesn't allow modifying port forwarding.

The example is correct but incomplete. By default the SSH port (22) on the guest machine is forwarded to port 2222 on the host machine:

1
2
3
4
5
6
7
8
9
# Source: https://github.com/mitchellh/vagrant/blob/v1.7.2/plugins/kernel_v2/config/vm.rb
if !@__networks["forwarded_port-ssh"]
network :forwarded_port,
guest: 22,
host: 2222,
host_ip: "127.0.0.1",
id: "ssh",
auto_correct: true
end

Changing to another port in Vagrantfile does not solve the problem. For example, switching from 2222 to 2322:

1
2
3
4
# Create a forwarded port mapping which allows access to a specific port
# within the machine from a port on the host machine. In the example below,
# accessing "localhost:8080" will access port 80 on the guest machine.
config.vm.network "forwarded_port", guest: 22, host: 2322

In this situation, you are forwarding both ports 2222 and 2322 to the SSH port on the guest machine, as shown in VirtualBox port forwarding settings:

Port Forwarding Rules

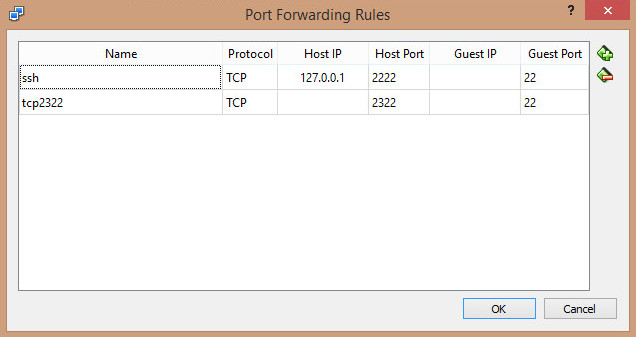
When bringing up the machine, there will be multiple host machine ports forwarding to the same SSH port.

1
2
3
4
$ vagrant up
==> default: Forwarding ports...
default: 22 => 2322 (adapter 1)
default: 22 => 2222 (adapter 1)

The SSH configuration shows the same outcome:

1
2
3
4
5
$ vagrant ssh-config
Host default
HostName 127.0.0.1
User chao
Port 2222

Of course, you can do:

1
$ ssh -p 2322 chao@localhost

This works, but we like the simple vagrant ssh command, and we just want to retain a single port 2322.

The solution is appending id: "ssh", and it must be specified in order to override the default forwarded SSH port. See < https://github.com/mitchellh/vagrant/issues/3232#issuecomment-39354659>:

1
2
# Must specified `id: "ssh"` in order to override the default forwarded SSH port.
config.vm.network :forwarded_port, guest: 22, host: 2322, id: "ssh"

After appending id: "ssh", the SSH configuration has also been updated:

1
2
3
4
5
$ vagrant ssh-config
Host default
HostName 127.0.0.1
User chao
Port 2322

Now, you are good to go:

1
$ vagrant ssh

Wait and then Grab the Lock and Update

When provisioning a new machine in Google Compute Engine with Vagrant, I spotted the following error messages when updating the system:

1
2
Could not get lock /var/lib/apt/lists/lock - open (11: Resource temporarily unavailable)
E: Unable to lock directory /var/lib/apt/lists/

It appears to be that I was just behind on the race to grab the lock on the APT update. Without getting the latest index, I am not able to upgrade the packages. An simple solution is to wait it out:

1
2
3
4
5
6
7
8
9
10
11
#!/usr/bin/env bash
#
# System Update
# =============
apt-get update
while [ "$?" != "0" ]; do
sleep 5
apt-get update
done
apt-get -y dist-upgrade

Setup Development Environment with Vagrant on Google Compute Engine

We usually use Vagrant to provision and manage VirtualBox virtual machines or VMs. And Vagrant only ships with VirtualBox support by default. But Vagrant can do much more. VirtualBox is just one of providers, additional providers can be added via the Vagrant plugin system. Here, we are going to use Google Compute Engine as the provider and setup a disposable development environment.

Basic steps involve:

  1. Install Vagrant
  2. Install vagrant-google plugin
  3. Add SSH keys to metadata server
  4. Add Vagrant box
  5. Add a Vagrantfile and override the defaults from the box
  6. Provision the machine

First, install Vagrant (exampled by Debian systems such as Ubuntu):

1
2
3
4
5
$ file=/tmp/vagrant.deb version=1.7.4 && \
curl -sSL https://dl.bintray.com/mitchellh/vagrant/vagrant_${version}_x86_64.deb > ${file} && \
sudo dpkg -i ${file} && \
rm ${file} && \
vagrant version

Install dependencies for building Debian packages, which are needed for the plugin:

1
$ sudo apt-get install -y build-essential

Install vagrant-google plugin:

1
2
3
$ vagrant plugin install vagrant-google
Installing the 'vagrant-google' plugin. This can take a few minutes...
Installed the plugin 'vagrant-google (0.2.1)'!

In order to SSH into the VM, we need to add public key to the instance which will be provisioned. In Google Compute Engine, this is done via metadata server at the project level.

Add the username to prefix the SSH key, so the Compute Engine will pick it up and create the corresponding user:

1
2
$ echo -n 'chao:' > /tmp/id_rsa.pub
$ cat ~/.ssh/id_rsa.pub >> /tmp/id_rsa.pub

Now the concatenated one will have the username:

1
chao:ssh-rsa AAAAB3... chao@ubuntu

Setting up SSH keys at the project level:

1
2
$ gcloud compute project-info add-metadata --metadata-from-file \
sshKeys=/tmp/id_rsa.pub

Google Cloud SDK or gcloud command should be installed already. Now it’s time to configure the machine to be provisioned.

The plugin provides a Vagrant box, which is a package format for Vagrant environments. It is not necessary to create a new box, we can just override the defaults by the Vagrantfile. So add the provider-specific box:

1
$ vagrant box add gce https://github.com/mitchellh/vagrant-google/raw/master/google.box

Make sure the box is added:

1
$ vagrant box list

Add a Vagrantfile and override the defaults:

Upgrade Vagrant in Windows from Command Line without Prompt

To determine whether your Vagrant is out of date or not, issue:

1
2
3
4
5
$ vagrant version
Installed Version: 1.7.4
Latest Version: 1.7.4
You're running an up-to-date version of Vagrant!

If yours is out of date, you can download it from its download page. However, being a lazy programmer, that’s still too many clicks. I want to figure out a way to update or install Vagrant from the command line without prompt.

And here you go!

Vagrant binaries are distributed by Bintray, its format is:

1
https://dl.bintray.com/mitchellh/vagrant/vagrant_{version}.msi

For example:

1
https://dl.bintray.com/mitchellh/vagrant/vagrant_1.7.4.msi

After you issue vagrant version, you know the correct version to upgrade, then download it:

1
$ curl -sSL https://dl.bintray.com/mitchellh/vagrant/vagrant_1.7.4.msi > vagrant.msi

Install it by msiexec:

1
$ msiexec /i C:\Users\Chao\Downloads\vagrant.msi /passive /norestart

Make sure to use the full path instead of relative .\vagrant.msi, and Vagrant should be installed in the default location C:\HashiCorp\Vagrant. To find out all possible options, Just type msiexec command only.

Saving a few clicks!

Git End-of-Line Normalization by AutoCRLF with Input

Using Vagrant file provision in a Windows host, the line endings are not converted from CRLF to LF (Linux systems). So, code cannot be executed properly in the guest Linux system. And also this is a frequently occurred message for working with Windows:

1
2
warning: LF will be replaced by CRLF in README.md.
The file will have its original line endings in your working directory.

One solution is to use UNIX line ending (LF) even in Windows, hence no conversion is needed. This is done by setting:

1
$ git config --global core.autocrlf input

Which means when committing the code to a remote repository, the line ending will be convert from CRLF to LF if any, but when checking out from the remote directory, no conversion from LF to CRLF is performed.

Launch Byobu Automatically on Vagrant SSH

I can use SSH directly instead of Vagrant SSH command for interactive programs such as top or running tmux sessions. But I frequently just want to run Tmux or Byobu upon login. I can do:

1
$ ssh -F ssh-config vagrant -t byobu

But still too much trouble to go through all SSH configuration steps. So, I ended up with two-step process:

1
$ vagrant ssh

Now inside the guest machine, I immediately type:

1
$ byobu

To bring up new Tmux session or attach existing sessions.

Use SSH Directly Instead of Vagrant SSH Command

Vagrant command vagrant ssh connects to the running virtual machine via SSH. SSH arguments can also be added:

1
2
3
4
5
6
7
8
$ vagrant ssh -h
Usage: vagrant ssh [options] [name] [-- extra ssh args]
Options:
-c, --command COMMAND Execute an SSH command directly
-p, --plain Plain mode, leaves authentication up to user
-h, --help Print this help

For example, execute a single command:

1
2
3
$ vagrant ssh -c date
Wed Dec 10 12:00:00 UTC 2014
Connection to 127.0.0.1 closed.

or:

1
2
$ vagrant ssh -- date
Wed Dec 10 12:00:00 UTC 2014

which prints no connection closed message.

Another example:

1
2
3
4
5
6
7
8
9
10
$ vagrant ssh -- 'cat /etc/hosts'
127.0.0.1 localhost
# The following lines are desirable for IPv6 capable hosts
::1 ip6-localhost ip6-loopback
fe00::0 ip6-localnet
ff00::0 ip6-mcastprefix
ff02::1 ip6-allnodes
ff02::2 ip6-allrouters
ff02::3 ip6-allhosts

However, interactive applications cannot be used in this way:

1
2
$ vagrant ssh -- top
TERM environment variable not set.

Well, we already have a virtual machine running, we can just use SSH directly.

Vagrant

  1. What is Vagrant?
  2. What are the main features?
  3. Why do they build it?
  4. How would it benefit me?
  5. Where does this fit into the stack?

What is Vagrant?

Vagrant is a configuration management tool for creating, configuring, and managing complete development environments in virtual machine.

What are the main features?

Development environment version control

Configuration for setting up development environment is in code (Vagrantfile), so the development environment can be version controlled.

Consistent but distributed development environments

Consistent development environment, build one development environment, and distribute to the rest of the team. Create identical development environment for everyone on the team.

Distributed development environment, but linked by source control. “I like to think of Vagrant as the Git of development clouds. Centralized development and test environments create bottlenecks. Vagrant lets developers work at their own pace and in their own environment, while keeping all the environment synchronized with each other.” (By Jeff Sussna) [1].

Disposable computing resource

“Vagrant lowers development environment setup time, increases development/production parity, and brings the idea of disposable compute resources down to the desktop.” [1]

“At the end of the day, Vagrant can suspend, halt, or destroy the development environment, keeping the overall system clean. Never again can developers forget to shut down a stray server process and waste precious compute resources.” [1]

Simple development environment setup

Forget about README or INSTALL instructions, type vagrant up and you are good to go.

“Say goodbye to ‘works on my machine’ bugs.” [2] For designers, “no more bothering other developers to help you fix your environment so you can test designs. Just check out the code, vagrant up, and start designing.” [2]