Archives

Node.js Installation Methods July 2016 Edition

Follow up with the previous blog on various methods to install Node.js, here is the updated one with Node.js v4.x and v6.x versions.

Install Node.js v4.x via NodeSource[^1] setup script:

1
2
$ curl -sL https://deb.nodesource.com/setup_4.x | sudo -E bash -
$ sudo apt-get install -y nodejs

sudo -E option indicates to the security policy that the user wishes to preserve their existing environment variables[^2].

With Docker and Dockerfile, sudo should be removed, because root:

1
2
RUN curl -sL https://deb.nodesource.com/setup_4.x | bash - && \
apt-get install -y nodejs

Install Node.js v6.x via the same method:

1
2
$ curl -sL https://deb.nodesource.com/setup_6.x | sudo -E bash -
$ sudo apt-get install -y nodejs

The above installation method has been tested on:

  • Debian 8.5
  • Node.js v4.4.7 and v6.2.2

In summary, the methods to install Node.js covered are:

  • Package manager
  • Nodesource script
  • From the source

[^1]: NodeSource provides binary distribution setup and support scripts.
[^2]: See man sudo.

Resetting GitLab User Password with a Simple Shell Script

Problem

Resetting password is one of the most common requests virtually in any system. In GitLab, user password can be updated by visiting the /admin/users page. But if you forgot the password for the root user or the admin user. You need another method to reset it.

Objective

The goal is to simplify the process of resetting GitLab user password by using CLI, so next time when encountering the same problem again, it will be quick and easy.

Settings

Self-hosted GitLab, installed in a Docker container.

Solutions

Step by step procedure to reset the root password is already provided by this GitLab documentation. By converting it into a Bash shell script and placing it in user’s home bin directory as an executable ~/bin/gitlab-password-reset file, we will have created a simple command to be run repeatedly:

1
2
3
4
5
6
7
8
9
10
#!/usr/bin/env bash
echo -n "Email: "; read MAIL
echo -n "Password: "; read -s PASS
echo # Ensure a new line
docker exec gitlab gitlab-rails runner -e production " \
user = User.find_by(email: '$MAIL'); \
user.password = user.password_confirmation = '$PASS'; \
user.save!"

We could simply run the long docker command instead of shell script. But since we’re dealing with password, it’s a good practice to avoid placing sensitive information on command line history log.

No trailing spaces are allowed on the password field, by the way.

Another solution is turning the Ruby evaluation into a script and save into somewhere like /srv/gitlab/config directory. Then, we can just run:

1
$ docker exec gitlab gitlab-rails runner -e production /etc/gitlab/scripts/password-reset.rb

Because we are using Docker to run GitLab, and the following directories are mapped from the host to the guest:

1
2
3
/srv/gitlab/config:/etc/gitlab
/srv/gitlab/logs:/var/log/gitlab
/srv/gitlab/data:/var/opt/gitlab

Therefore, when executing the Ruby script, it’s /etc/gitlab instead of /srv/gitlab. However, you will need to figure out how to get the email and password into the script. That’s for you to answer.

Why Using Exact Versions in NPM Package Dependencies

Versions frequently used in NPM package dependencies are caret ranges or ^version. And npm install uses caret ranges as well.

Caret range:

Allows changes that do not modify the left-most non-zero digit in the [major, minor, patch] tuple. In other words, this allows patch and minor updates for versions 1.0.0 and above, patch updates for version 0.x >=0.1.0, and no updates for version 0.0.x.

Most of time, using caret ranges as dependency versions work perfectly fine. But once a while, there are bugs. In one of projects, JS-YAML with caret version ^3.4.3 was used and installed:

1
2
3
4
5
{
"dependencies": {
"js-yaml": "^3.4.3"
}
}

Time passes. When npm install was run again from a freshly cloned project code base, version 3.5.2 was installed. Since JS-YAML version 3.5.0, errors are thrown when safe loading a spec with duplicate keys. If there are no duplicate keys in the YAML file, this will be fine. However, one of the files has it. The correct approach is to actually fix the duplicate keys. But it requires additional work back and forth. You’ve heard this before: “Hey it works when I installed it.”

The point here is to use exact versions instead of letting the package manager decides by dropping the caret character:

1
2
3
4
5
{
"dependencies": {
"js-yaml": "3.4.3"
}
}

This will avoid the above mentioned problem. We can manually update the outdated NPM packages.

Don’t let machine decide. You Do!

Setting Up Local DNS Server for Multi-Devices

As always, the first thing you have to ask yourself is that why do you want to set up a DNS server? Here are a few of mine:

  • Access web services via custom domains instead of IP addresses
  • Update multiple devices (including mobile devices) is time consuming and inconvenient
  • Router does not provide a DNS server

I run many web services in the local network, for example, GitLab for code repository and Ghost for blogging. Instead of typing IP address for each service, it will be much easier to use custom domain names, for example, accessing my blog via http://ghost/, not dot com nor localhost.

This can be easily done if there is just one machine. You can update the host configuration file in the local machine such as /etc/hosts in Linux or C:\Windows\System32\drivers\etc\hosts in Windows. But I have multiple devices: a laptop, a tablet, and of course a smartphone. Updating multiple devices is a pain. And for many mobile devices running systems such as iOS or Android, it is not easy to edit the host configuration file without rooting the devices. Therefore, we will opt to update a single DNS configuration file.

DNS configuration can be inherited from the DHCP server from the local network router. Unfortunately, the router I have does not provide a built-in DNS server. I have to setup my own DNS server. Once the DNS server has been setup, the router will use the server as the primary DNS server, and falls back to default gateway IP as the secondary DNS server, or we can use either Google’s public DNS server with IP address 8.8.8.8 or any other alternatives.

  • Primary DNS server: 192.168.0.100
  • Secondary DNS server: 192.168.0.1, 8.8.8.8 or others

I am going to setup a DNS server in a Debian Jessie machine. Here is a summary of steps:

  1. Install BIND
  2. Add custom zone

Keeping Routing Simple and Separated with Koa Router

Debugging an error when using koa-router module that multiple routes were invoked on a single HTTP request:

1
2
3
4
5
6
7
8
9
10
11
12
13
14
15
16
17
18
19
20
var app = require('koa')();
var router = require('koa-router')();
router.use(function *(next) {
this.body = {};
yield next;
});
router.get('/users', function *(next) {
this.body['/users'] = true;
yield next;
});
router.get('/users/:id?', function *(next) {
this.body['/users/:id?'] = true;
yield next;
});
app.use(router.routes());
app.listen(3000);

When making a request to get a list of users, it will match both routes:

1
2
3
4
5
6
7
8
9
10
$ http :3000/users
HTTP/1.1 200 OK
Connection: keep-alive
Content-Length: 34
Content-Type: application/json; charset=utf-8
{
"/users": true,
"/users/:id?": true
}

Because in the second route :id is optional, and since there is yield next statement in the first route, the second route will be executed subsequently.

The cause of the bug is the design of the routing GET /users/:id?. The correct routes are:

  • GET /users: Retrieve a list (array) of users.
  • GET /users/:id: Retrieve a single user object.

The question mark should not be appended to the end of id parameter, which effectively marking the route to perform both duties. It’s better to keep them simple and keep them separated.

Passing Information Through Koa Middleware Via "this.state"

Koa has a context object created during every request/response cycle. The context is referenced via this in the middleware. Much information are captured in the context, such as req and res. In order to avoid polluting the context and colliding with other middleware, the information from your application should be encapsulated into this.state property, a namespace for passing information through middleware during request/response cycle:

1
2
3
4
5
6
7
8
9
10
11
12
require('koa')().use(function *(next) {
var state = this.state;
state.user = yield users.create(this.request.body);
state.code = 201;
state.body = {
name: user.name,
mail: user.mail
};
yield next;
}).listen(3000);

The this.state has been initialized into an empty object:

1
2
3
require('koa')().use(function *(next) {
this.body = this.state;
}).listen(3000);

Therefore, we can start using it right away without doing our own initialization:

1
2
3
4
5
6
7
$ http :3000
HTTP/1.1 200 OK
Connection: keep-alive
Content-Length: 2
Content-Type: application/json; charset=utf-8
{}

Overriding the Default Forwarded SSH Port in Vagrant

TLDR:

1
2
# Must specified `id: "ssh"` in order to override the default forwarded SSH port.
config.vm.network :forwarded_port, guest: 22, host: 2322, id: "ssh"

What’s the problem? If running multiple virtual machines managed by Vagrant, SSH port collision will happen:

1
2
3
4
5
6
7
8
9
10
11
12
13
Vagrant cannot forward the specified ports on this VM, since they
would collide with some other application that is already listening
on these ports. The forwarded port to 2222 is already in use
on the host machine.
To fix this, modify your current projects Vagrantfile to use another
port. Example, where '1234' would be replaced by a unique host port:
config.vm.network :forwarded_port, guest: 22, host: 1234
Sometimes, Vagrant will attempt to auto-correct this for you. In this
case, Vagrant was unable to. This is usually because the guest machine
is in a state which doesn't allow modifying port forwarding.

The example is correct but incomplete. By default the SSH port (22) on the guest machine is forwarded to port 2222 on the host machine:

1
2
3
4
5
6
7
8
9
# Source: https://github.com/mitchellh/vagrant/blob/v1.7.2/plugins/kernel_v2/config/vm.rb
if !@__networks["forwarded_port-ssh"]
network :forwarded_port,
guest: 22,
host: 2222,
host_ip: "127.0.0.1",
id: "ssh",
auto_correct: true
end

Changing to another port in Vagrantfile does not solve the problem. For example, switching from 2222 to 2322:

1
2
3
4
# Create a forwarded port mapping which allows access to a specific port
# within the machine from a port on the host machine. In the example below,
# accessing "localhost:8080" will access port 80 on the guest machine.
config.vm.network "forwarded_port", guest: 22, host: 2322

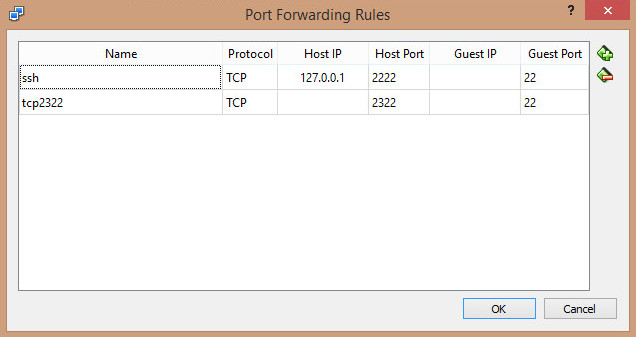
In this situation, you are forwarding both ports 2222 and 2322 to the SSH port on the guest machine, as shown in VirtualBox port forwarding settings:

Port Forwarding Rules

When bringing up the machine, there will be multiple host machine ports forwarding to the same SSH port.

1
2
3
4
$ vagrant up
==> default: Forwarding ports...
default: 22 => 2322 (adapter 1)
default: 22 => 2222 (adapter 1)

The SSH configuration shows the same outcome:

1
2
3
4
5
$ vagrant ssh-config
Host default
HostName 127.0.0.1
User chao
Port 2222

Of course, you can do:

1
$ ssh -p 2322 chao@localhost

This works, but we like the simple vagrant ssh command, and we just want to retain a single port 2322.

The solution is appending id: "ssh", and it must be specified in order to override the default forwarded SSH port. See < https://github.com/mitchellh/vagrant/issues/3232#issuecomment-39354659>:

1
2
# Must specified `id: "ssh"` in order to override the default forwarded SSH port.
config.vm.network :forwarded_port, guest: 22, host: 2322, id: "ssh"

After appending id: "ssh", the SSH configuration has also been updated:

1
2
3
4
5
$ vagrant ssh-config
Host default
HostName 127.0.0.1
User chao
Port 2322

Now, you are good to go:

1
$ vagrant ssh

Re-assembling the Requested URL

It is simple to know the request URL path, it’s one (this.url in Koa) used by routing, but if you are looking to get the complete URL, it’s a little bit complicated. Luckily, there is a quick way to re-assemble the requested URL in Koa, if proxy is not a concern:

1
var url = this.request.protocol + '://' + this.request.host + this.request.originalUrl;

Or a shorter version:

1
var url = this.protocol + '://' + this.host + this.originalUrl;

The port number is included in this.host, for example: localhost:3000.

Putting into a complete script:

1
2
3
4
require('koa')().use(function *() {
// Echo back the request URL.
this.body = this.protocol + '://' + this.host + this.originalUrl;
}).listen(3000);

Assume that you have a server running on the host www.example.com with SSL enabled. If you make a request to the server with the URL: https://www.example.com/path, this URL will be echoed back in the response by the above script.

Calculate Hashes for All OpenSSL Digest Algorithms

Based on the following Node.js statement:

1
require('crypto').createHash(algorithm).update('secret', 'utf8').digest('base64');

On a Ubuntu 14.04 system with OpenSSL:

1
2
$ openssl version
OpenSSL 1.0.1f 6 Jan 2014

List available digest algorithms:

1
2
3
4
5
6
7
8
9
10
11
12
13
14
15
16
17
18
19
20
21
22
23
24
25
26
27
28
29
30
31
32
33
34
35
36
37
38
39
40
41
42
43
44
45
46
47
48
49
50
51
52
53
54
$ openssl list-message-digest-algorithms
DSA
DSA-SHA
DSA-SHA1 => DSA
DSA-SHA1-old => DSA-SHA1
DSS1 => DSA-SHA1
MD4
MD5
RIPEMD160
RSA-MD4 => MD4
RSA-MD5 => MD5
RSA-RIPEMD160 => RIPEMD160
RSA-SHA => SHA
RSA-SHA1 => SHA1
RSA-SHA1-2 => RSA-SHA1
RSA-SHA224 => SHA224
RSA-SHA256 => SHA256
RSA-SHA384 => SHA384
RSA-SHA512 => SHA512
SHA
SHA1
SHA224
SHA256
SHA384
SHA512
DSA
DSA-SHA
dsaWithSHA1 => DSA
dss1 => DSA-SHA1
ecdsa-with-SHA1
MD4
md4WithRSAEncryption => MD4
MD5
md5WithRSAEncryption => MD5
ripemd => RIPEMD160
RIPEMD160
ripemd160WithRSA => RIPEMD160
rmd160 => RIPEMD160
SHA
SHA1
sha1WithRSAEncryption => SHA1
SHA224
sha224WithRSAEncryption => SHA224
SHA256
sha256WithRSAEncryption => SHA256
SHA384
sha384WithRSAEncryption => SHA384
SHA512
sha512WithRSAEncryption => SHA512
shaWithRSAEncryption => SHA
ssl2-md5 => MD5
ssl3-md5 => MD5
ssl3-sha1 => SHA1
whirlpool

Calculate hashes for each and every uniquely listed algorithm:

1
2
3
4
5
6
7
8
9
10
11
12
13
14
15
16
17
18
19
20
21
22
23
24
25
26
27
28
29
30
31
32
33
34
35
36
37
38
39
40
41
42
43
44
45
46
47
48
$ openssl list-message-digest-algorithms | \
cut -d ' ' -f 1 | \
xargs -n 1 -I {} node -e "algorithm = '{}'; \
digest = require('crypto').createHash('{}').update('secret', 'utf8').digest('base64'); \
console.log(algorithm, digest)" | \
sort -u
DSA 5en6G6MezRroT3XKqkdPOmY/BfQ=
DSA-SHA1 5en6G6MezRroT3XKqkdPOmY/BfQ=
DSA-SHA1-old 5en6G6MezRroT3XKqkdPOmY/BfQ=
DSA-SHA 5en6G6MezRroT3XKqkdPOmY/BfQ=
dsaWithSHA1 5en6G6MezRroT3XKqkdPOmY/BfQ=
dss1 5en6G6MezRroT3XKqkdPOmY/BfQ=
DSS1 5en6G6MezRroT3XKqkdPOmY/BfQ=
ecdsa-with-SHA1 5en6G6MezRroT3XKqkdPOmY/BfQ=
md4WithRSAEncryption Z9Pa/vY/8AYDru83ac+/DQ==
MD4 Z9Pa/vY/8AYDru83ac+/DQ==
md5WithRSAEncryption Xr4ilOzQ4PCOq3aQ0qbuaQ==
MD5 Xr4ilOzQ4PCOq3aQ0qbuaQ==
ripemd160WithRSA zZi/AgLvB+OOh/a9lEXl5zMeLHg=
RIPEMD160 zZi/AgLvB+OOh/a9lEXl5zMeLHg=
ripemd zZi/AgLvB+OOh/a9lEXl5zMeLHg=
rmd160 zZi/AgLvB+OOh/a9lEXl5zMeLHg=
RSA-MD4 Z9Pa/vY/8AYDru83ac+/DQ==
RSA-MD5 Xr4ilOzQ4PCOq3aQ0qbuaQ==
RSA-RIPEMD160 zZi/AgLvB+OOh/a9lEXl5zMeLHg=
RSA-SHA1-2 5en6G6MezRroT3XKqkdPOmY/BfQ=
RSA-SHA1 5en6G6MezRroT3XKqkdPOmY/BfQ=
RSA-SHA224 lcf7ypKsUIOv2mKlZKPQFPw7cskUDjy5nqa/Eg==
RSA-SHA256 K7gNU3sdo+OL0wNhqoVWhr3g6s1xYv72ol/pe/Unols=
RSA-SHA384 WKd1ukESvjAFrkQHznV9iP2nHUBJe7gCbsrFTU4//HIyzo3jq1rLMK45dg/ufFPt
RSA-SHA512 vSsar3708Jvp9Szi2NWZZ02Bqp1qRCFpbcTZPdBhnWgs5WtNZKnvCXdhztmeD2cmW192CF5bDufKRpayrW/isg==
RSA-SHA f72qWouzjoc6vqk8vf5NBIVHFXs=
SHA1 5en6G6MezRroT3XKqkdPOmY/BfQ=
sha1WithRSAEncryption 5en6G6MezRroT3XKqkdPOmY/BfQ=
SHA224 lcf7ypKsUIOv2mKlZKPQFPw7cskUDjy5nqa/Eg==
sha224WithRSAEncryption lcf7ypKsUIOv2mKlZKPQFPw7cskUDjy5nqa/Eg==
SHA256 K7gNU3sdo+OL0wNhqoVWhr3g6s1xYv72ol/pe/Unols=
sha256WithRSAEncryption K7gNU3sdo+OL0wNhqoVWhr3g6s1xYv72ol/pe/Unols=
sha384WithRSAEncryption WKd1ukESvjAFrkQHznV9iP2nHUBJe7gCbsrFTU4//HIyzo3jq1rLMK45dg/ufFPt
SHA384 WKd1ukESvjAFrkQHznV9iP2nHUBJe7gCbsrFTU4//HIyzo3jq1rLMK45dg/ufFPt
SHA512 vSsar3708Jvp9Szi2NWZZ02Bqp1qRCFpbcTZPdBhnWgs5WtNZKnvCXdhztmeD2cmW192CF5bDufKRpayrW/isg==
sha512WithRSAEncryption vSsar3708Jvp9Szi2NWZZ02Bqp1qRCFpbcTZPdBhnWgs5WtNZKnvCXdhztmeD2cmW192CF5bDufKRpayrW/isg==
SHA f72qWouzjoc6vqk8vf5NBIVHFXs=
shaWithRSAEncryption f72qWouzjoc6vqk8vf5NBIVHFXs=
ssl2-md5 Xr4ilOzQ4PCOq3aQ0qbuaQ==
ssl3-md5 Xr4ilOzQ4PCOq3aQ0qbuaQ==
ssl3-sha1 5en6G6MezRroT3XKqkdPOmY/BfQ=
whirlpool 4GG4emdK44gOFZq1XtNdbF6Kau+sarCDBKUFiAGNN3soY5uxX97t8AbVfkX3tCmObf786vfJLIJqcI/m0RVusw==